Photography and Spotting
The guide to making the most of your time
at Wattisham. The best photo
spots
are so marked.
A few words of note though, but pretty
similar to those at any airfield.
Respect the land around the base, and do not
trespass on or damage any property.
Take your rubbish and litter home with you.
Rubbish attracts birds, and birds and active aircraft do not mix well.
Do not park in front of Crash Gates, or on
the access tracks leading to them. You will almost certainly be asked move your
vehicle as parking here can impede rapid access by the airfield crews to any
emergency.
Keep your eyes open for any suspicious
activity, and don't hesitate to report it to the Main Guardroom (01449 728220),
the Royal Military Police (01449 728299) or even the Anti-Terrorist Hotline
(0800 789321).
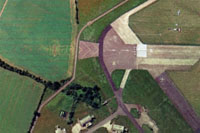
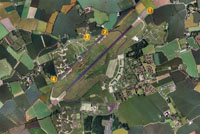 An
overview photo of the airfield and surrounds, north orientated. The runway runs
North-East to South-West, and generally the prevailing winds mean that the 23
end is more often in use. However, helicopters are not always constrained by
runway headings, so don't be surprised to see them arrive and depart in various
directions.
An
overview photo of the airfield and surrounds, north orientated. The runway runs
North-East to South-West, and generally the prevailing winds mean that the 23
end is more often in use. However, helicopters are not always constrained by
runway headings, so don't be surprised to see them arrive and depart in various
directions.
The main dispersal is to the South of the
runway, with 7 Battalion being located near the 05 runway end, on the old cross
runway.
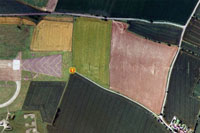 There are 5 main locations
to view and photograph the aircraft here. These are all on public land so make
sure you treat the area with respect and do not block
any exits or crash gates. The small track leading to Crash Gate 1
is the place
to use for arrival photos on 23, spot
1. Make sure you do NOT park your car on the track as this has
to be kept free for emergency access. This has the sun behind you for most of the
day, and can offer some superb opportunities provided you do not go too far up
the track as you will then be too close to the approach path. In the evening,
good shots can also be had at the 23 approach end from the road that parallels
the runway to the north, spot
2.
There are 5 main locations
to view and photograph the aircraft here. These are all on public land so make
sure you treat the area with respect and do not block
any exits or crash gates. The small track leading to Crash Gate 1
is the place
to use for arrival photos on 23, spot
1. Make sure you do NOT park your car on the track as this has
to be kept free for emergency access. This has the sun behind you for most of the
day, and can offer some superb opportunities provided you do not go too far up
the track as you will then be too close to the approach path. In the evening,
good shots can also be had at the 23 approach end from the road that parallels
the runway to the north, spot
2.
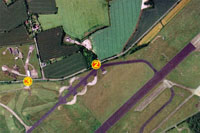 Crash
Gates 2 and 3 are good for spotting, but less useful for photography.
Park in the nearby lay-bys, but do not block the Crash Gates themselves. There is a
high fence around the airfield which can get in the way of photography, and also
the sun is generally in your face from here, except for the last hour or so
before sunset. However, with good optics you can read many of the aircraft
parked on the main apron, as well as those arriving and departing. Check out
photos taken at spot
3 and spot
4.
Crash
Gates 2 and 3 are good for spotting, but less useful for photography.
Park in the nearby lay-bys, but do not block the Crash Gates themselves. There is a
high fence around the airfield which can get in the way of photography, and also
the sun is generally in your face from here, except for the last hour or so
before sunset. However, with good optics you can read many of the aircraft
parked on the main apron, as well as those arriving and departing. Check out
photos taken at spot
3 and spot
4.
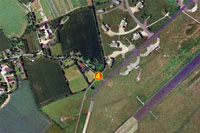
Crash Gate 4 is the only place where you
will be able to easily see aircraft at 7 Battalion REME. You will need to park
away from the Crash Gate and walk down the lane in order to avoid blocking
access. This gate is next to
the old 74 Sqn northern HAS site, see spot
5. Again, the fence and
position of the sun can conspire against decent photography here, but if you are
prepared to walk past spot
6 you can follow the fence around to the 05 threshold to spot
7 to get some
sunny side shots if the aircraft are using this runway. Further out on the
approach is spot
8 if you have a decent lens.
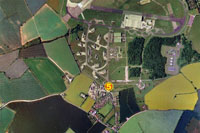
Further round is Crash
Gate 5 which is marked locally as Gate 2. This is next to
the old 56 Sqn Southern HAS site and from here you can get near to the 05
runway threshold. Unless you are prepared to walk a
distance, this end offers only limited photographic opportunities, however you
will usually be sure of being the right side for the sun.